Fuel gauge
5 participants
Page 1 sur 1
 Fuel gauge
I have discovered my fuel gauge not show empty when there is no fuel in the fuel tank.
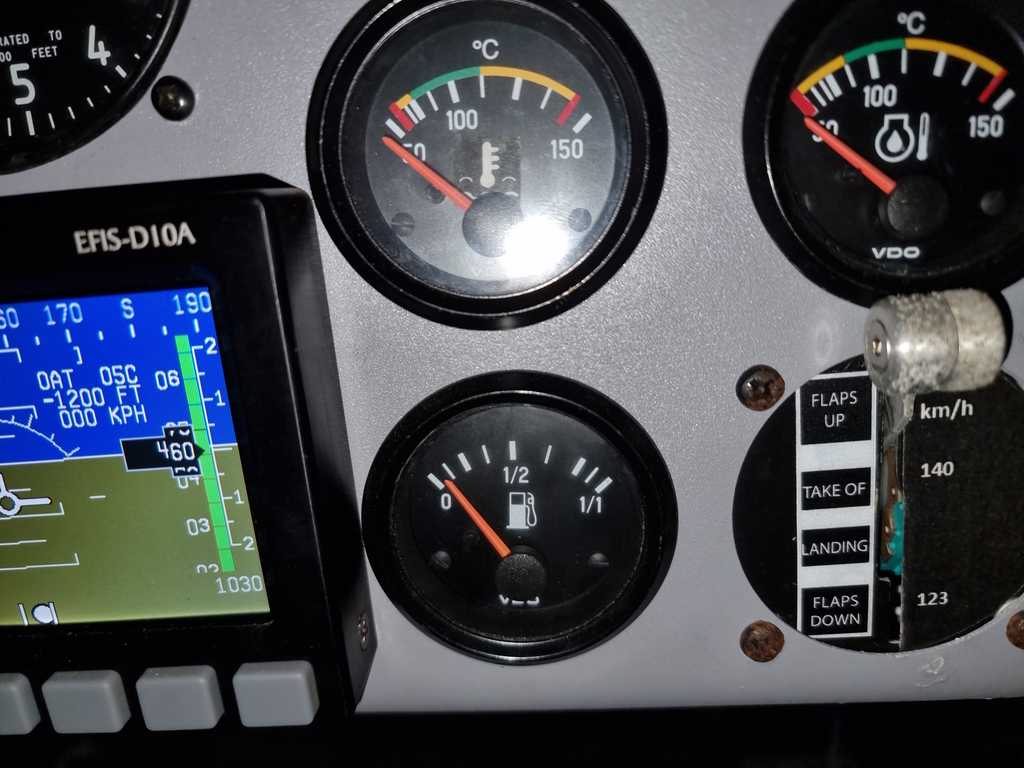
The fueltank probe is a float type. I think it works it resistance/ohms as say 3-180 ohm on the gauge.

There is no adjustment screws on the gauge or the fueltank probe.
Does anyone have any ideas on what I can do to adjust it so it shows zero when empty?

The fueltank probe is a float type. I think it works it resistance/ohms as say 3-180 ohm on the gauge.

There is no adjustment screws on the gauge or the fueltank probe.
Does anyone have any ideas on what I can do to adjust it so it shows zero when empty?

flyverjonas- Nombre de messages : 13
Localisation : Denmark
Constr./proprio. : MCR01 ULC sn:406
Date d'inscription : 27/12/2022
 Re: Fuel gauge
Well, it seems that nobody knows. Sorry for that.
I have just an idea : did you check if your float is going well completely down?
I have just an idea : did you check if your float is going well completely down?
 Re: Fuel gauge
Hello Flyverjonas,
I don't have the same gauge...
On the other hand, concerning the fueltank probe, I have two adjustment screws on the top, directly accessible.
Mini
I don't have the same gauge...
On the other hand, concerning the fueltank probe, I have two adjustment screws on the top, directly accessible.
Mini

Mini- Nombre de messages : 1114
Localisation : LFAI (Nangis) et LFKX (Méribel)
Constr./proprio. : Proprio. VLA n° 36 912S tripale PV électr.
Date d'inscription : 10/10/2008
 Re: Fuel gauge
Hi there all,
Yep, to me zéro and max are trimmed on the gauges …
Yep, to me zéro and max are trimmed on the gauges …

Max Cointe- Nombre de messages : 828
Localisation : Auxerre / LFLA
Constr./proprio. : propriétaire et mainteneur
Date d'inscription : 23/10/2012
 Update
I was at the airfield today to get a little further.
I started by measuring (Ohms/resistance) in the wire 2-pin connector from the fuel tank probe.
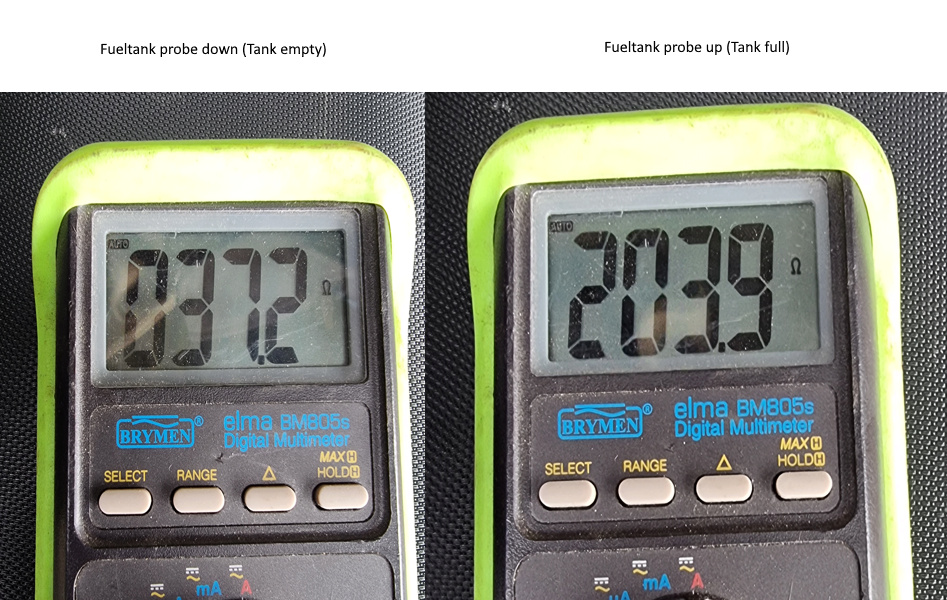
37 Ohms with the probe float at the lowest point, and my VDO gauge works from 3 to 180 Ohms. Now I know why the gauge never show empty.
Unfortunately, there are no adjustment points on the top of the fuel tank probe (not even under the black rubber in the middle)

My fuel probe must be defective some way
I found this thread: https://mcr01passion.forumperso.com/t926-sp98-100ll-et-jauge-capacitive
Where marc314 own ULC n°407 (sister plane to mine n°406 ) describes that he has changed his fuel probe as the original is bad and has low resolution, to an new WEMA fuel probe with high resolution scale.
I want to keep my VDO gauge (It matchs the others gauges) I think it will work fine. The WEMA fuel probe works with 0 to 190 Ohms. So when the fuel tank is full 100%, will the gauge show full perhaps down to 90% fuel (no matter) and in the other end will it show empty at perhaps 5% fuel left = perfect
Next step is to take out the old fuel tank probe. It look like its glued on/in. If I read (Google translated) what marc314 describe he had buy the probe with threads (S3 model). Is the original probe also with threads or what is the best way to get it out? Do someone know?
I started by measuring (Ohms/resistance) in the wire 2-pin connector from the fuel tank probe.

37 Ohms with the probe float at the lowest point, and my VDO gauge works from 3 to 180 Ohms. Now I know why the gauge never show empty.
Unfortunately, there are no adjustment points on the top of the fuel tank probe (not even under the black rubber in the middle)

My fuel probe must be defective some way
I found this thread: https://mcr01passion.forumperso.com/t926-sp98-100ll-et-jauge-capacitive
Where marc314 own ULC n°407 (sister plane to mine n°406
I want to keep my VDO gauge (It matchs the others gauges) I think it will work fine. The WEMA fuel probe works with 0 to 190 Ohms. So when the fuel tank is full 100%, will the gauge show full perhaps down to 90% fuel (no matter) and in the other end will it show empty at perhaps 5% fuel left = perfect
Next step is to take out the old fuel tank probe. It look like its glued on/in. If I read (Google translated) what marc314 describe he had buy the probe with threads (S3 model). Is the original probe also with threads or what is the best way to get it out? Do someone know?

flyverjonas- Nombre de messages : 13
Localisation : Denmark
Constr./proprio. : MCR01 ULC sn:406
Date d'inscription : 27/12/2022
 Re: Fuel gauge
Hello Flyverjonas,flyverjonas a écrit:I want to keep my VDO gauge (It matchs the others gauges) I think it will work fine. The WEMA fuel probe works with 0 to 190 Ohms. So when the fuel tank is full 100%, will the gauge show full perhaps down to 90% fuel (no matter) and in the other end will it show empty at perhaps 5% fuel left = perfect
I mean you'll get the same effect by inserting an adjustable resistance as serial in your circuit (on one wire or the other). The matter is to reduce your 37.2 ohms to 3 ohms at the lower point. I don't know the exact value (thats why I suggest an adjustable), but any electronics man can tell you.
This way should be cheaper and quite workless.
Mini

Mini- Nombre de messages : 1114
Localisation : LFAI (Nangis) et LFKX (Méribel)
Constr./proprio. : Proprio. VLA n° 36 912S tripale PV électr.
Date d'inscription : 10/10/2008
flyverjonas aime ce message
 Re: Fuel gauge
Mini a écrit:
I mean you'll get the same effect by inserting an adjustable resistance as serial in your circuit (on one wire or the other). The matter is to reduce your 37.2 ohms to 3 ohms at the lower point. I don't know the exact value (thats why I suggest an adjustable), but any electronics man can tell you.
This way should be cheaper and quite workless.
Mini
Thxs Mini for that infomation
I'v only know about how to raise the ohms value by put a resistor in line, not how to lower the value.
I found this: https://www.quora.com/How-do-you-change-ohms-on-a-fuel-sending-unit
"Resistor in parallel" I understand it like this:If the resistance (ohms) is too high, placing a resistor in parallel will reduce the resistance, and adding one in series will increase the resistance. That resistor can be placed anywhere in the line, so it can be installed outside of the fuel tank rather than inside the tank on the sending unit. One end of the sender resistor on the sending unit is grounded, so the resistor must be placed in the circuit power line and ground, not the signal line to the gauge if you intend to keep the gauge reading accurate.
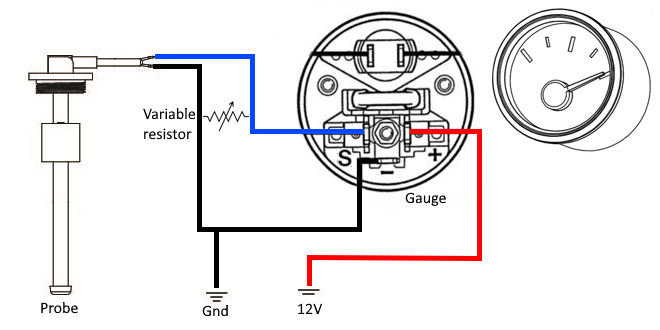
I will try that and see what it does. As You say, its way easier and cheaper

flyverjonas- Nombre de messages : 13
Localisation : Denmark
Constr./proprio. : MCR01 ULC sn:406
Date d'inscription : 27/12/2022
 Re: Fuel gauge
flyverjonas a écrit:
My fuel probe must be defective some way
Hello flyverjonas ,
I agree with you, your fuel sender is probably defective.
European standard Wema fuel senders are 0(empty)-190(full) ohms. Yours is 37-204... Is it a Wema probe? It seems screwed with sealant paste.
Your gauge is 0-180 ohms, almost well suited for a 0-190 sender, definitively not for 37-204!
These senders are constituted of a variable number of reed switches in parallel. These switches are all normally open

The magnet in the float is able to close one of the switches, which determines the resistance of the probe. So the sender is a variable resistor, and the gauge is actually an ohmmeter.
If you are absolutely sure that 1) your sender was initially 0-190 ohms and 2) there is no parasitic resistance in series with the sender (defective electrical connector for example), then either the float is blocked above the bottom of the sender (very unlikely) or one reed switch is stuck. But this doesn't explain the 204 ohms maximum value... Check again for poor contact somewhere.
I cannot see any way of correcting this issue with added resistors. A resistor in series would only accentuate the problem. With a 2.7k resistor in parallel, the maximum resistance of the sender would decrease to approximately 190 ohms, but the minimum value would be almost unchanged: 36.5 ohms.
This could be a good opportunity to replace this sender by a high résolution one!
Benjamin

Benjamin- Nombre de messages : 103
Localisation : Cuers Pierrefeu LFTF
Constr./proprio. : MCR Sportster n°206 F-PBCF
Date d'inscription : 27/04/2009
 Re: Fuel gauge
Hello Flyverjonas,
I'm sorry for that mistake.
However, I agree with Benjamin when he says that you should first of all investigate a poor contact in a connector or a welding point, as it's likely the system was working well at first installation.
Mini
You're right, I confused Ohms withs Volts, so the resistor should not be installed in serial.flyverjonas a écrit:I'v only know about how to raise the ohms value by put a resistor in line, not how to lower the value.
I'm sorry for that mistake.
Introducing a resistor in parallel is perhaps a solution (maybe by decreasing the current responsible of the needle deviation), but the text above specifies the resistor should be installed between the red and the black line (circuit power line and ground), not between the blue line (signal) and the black line (ground).flyverjonas a écrit:I found this: https://www.quora.com/How-do-you-change-ohms-on-a-fuel-sending-unit"Resistor in parallel" I understand it like this:If the resistance (ohms) is too high, placing a resistor in parallel will reduce the resistance, and adding one in series will increase the resistance. That resistor can be placed anywhere in the line, so it can be installed outside of the fuel tank rather than inside the tank on the sending unit. One end of the sender resistor on the sending unit is grounded, so the resistor must be placed in the circuit power line and ground, not the signal line to the gauge if you intend to keep the gauge reading accurate.
However, I agree with Benjamin when he says that you should first of all investigate a poor contact in a connector or a welding point, as it's likely the system was working well at first installation.
Mini

Mini- Nombre de messages : 1114
Localisation : LFAI (Nangis) et LFKX (Méribel)
Constr./proprio. : Proprio. VLA n° 36 912S tripale PV électr.
Date d'inscription : 10/10/2008
 Re: Fuel gauge
Today, I tried to do some of yours ideas.
I started by measuring Ohms again. 32,6 Ohms on the lowest and 199,3 on the highest. I tried to bend, twist, pull, push the wire, No change.
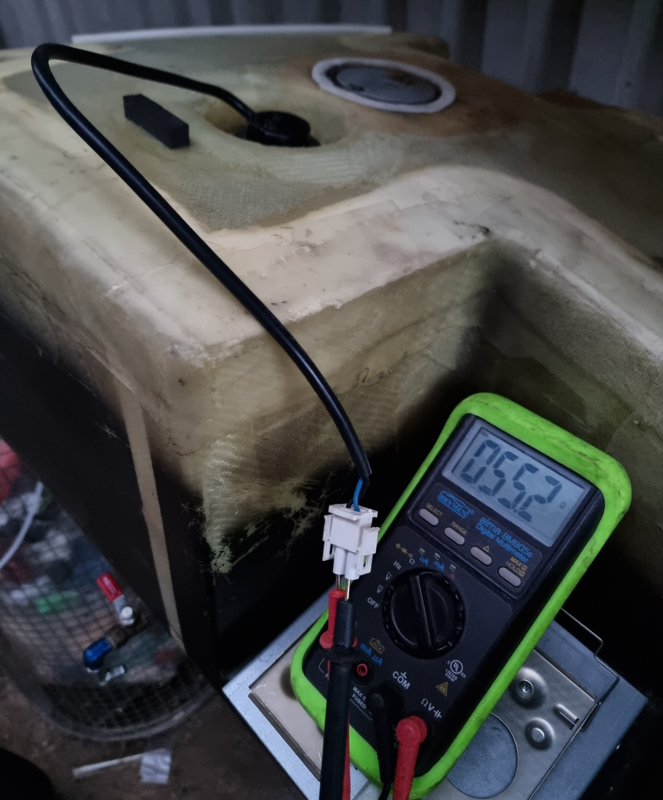
I tried to push the float down slowly meanwhile checking the Ohms to check the points. Starting on 199.3, 151.9, 125.9, 102.0, 78.1, 55.2, 32.6. Something is missing! I would mean there should be a point between 199.3 and 151.9 around 175 Ohms.
One of the reed switches most be stuck closed and always "give" around 25 Ohms too much. If I take all mine readings and take 25 Ohms off = 174, (150), 126, 100, 77, 53, 30, 7. Remember my VDO gauge expect values between 3 and 180 Ohms.
After it was identified that probe is defective, it was time to try to get the probe out. No one had written back on how the probe is taken out. But the probe top had some cutouts on the sides what could look like some place for a spanner. After a light pull with the "Swedish key " the probe went loose and a broken O-ring jumped out and I could screw the probe out
  Easy job!

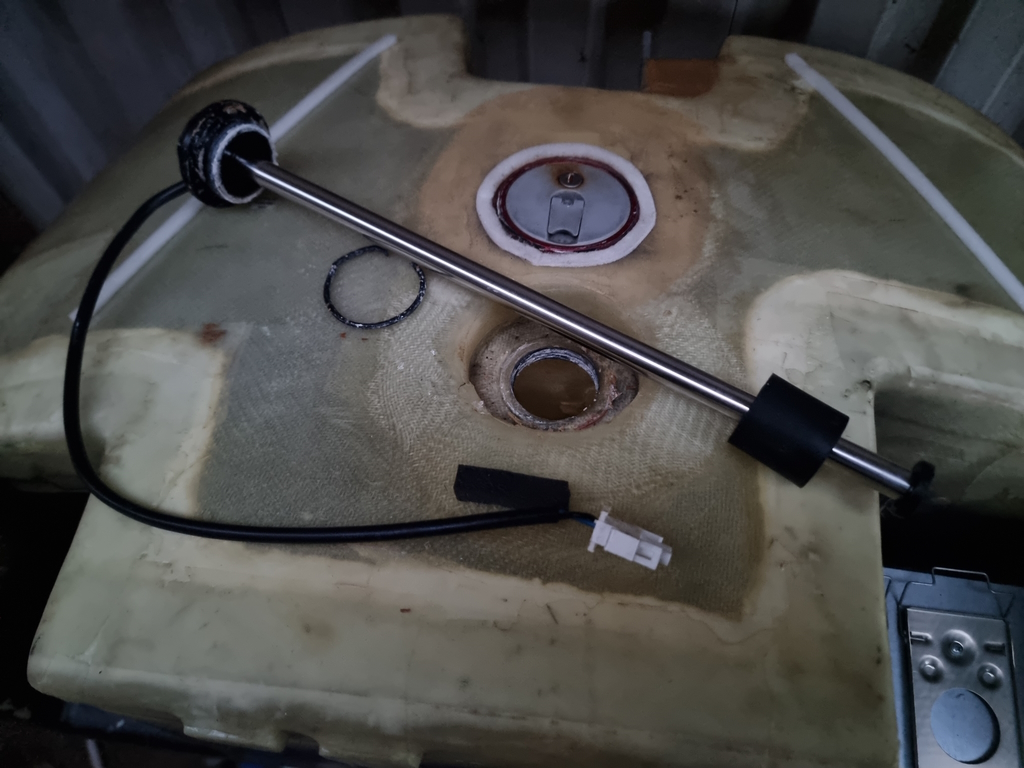
Now is to find out about new WEMA fuel probe (1 ¼" BSP thread) has the same thread as the old probe.
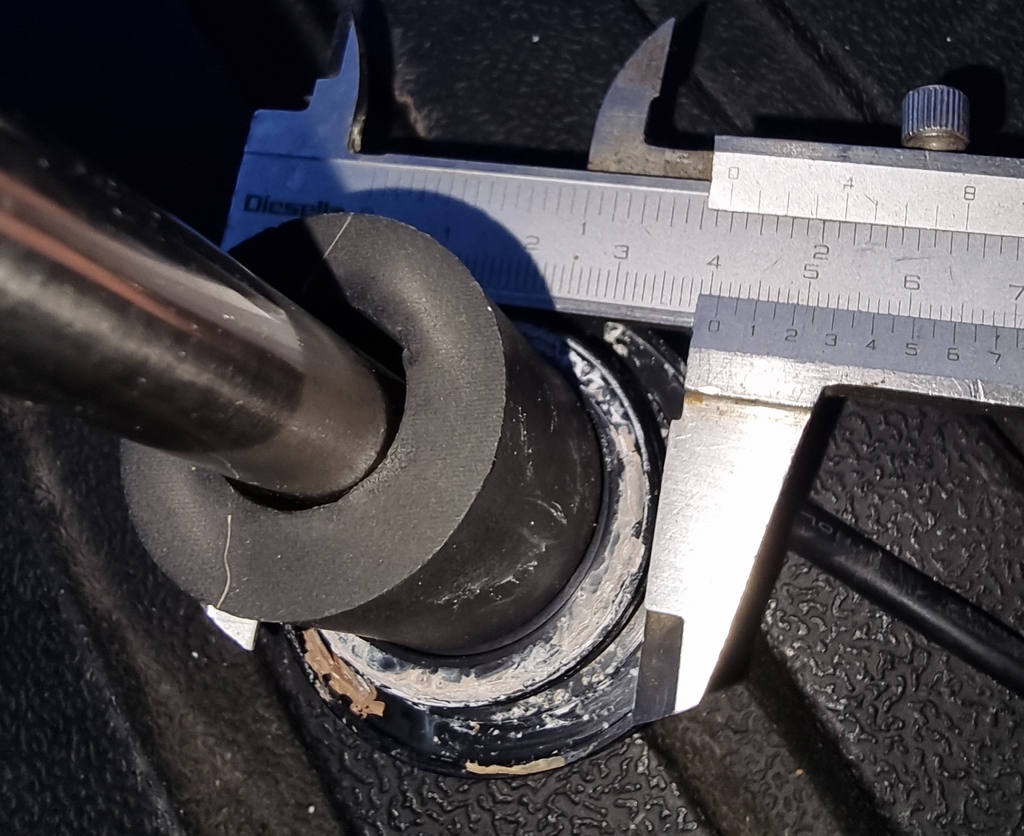
Google says = "1-1/4 Inch BSP" = "41.91 mm / 1.650" Can anyone confirm it is the same thread?
I started by measuring Ohms again. 32,6 Ohms on the lowest and 199,3 on the highest. I tried to bend, twist, pull, push the wire, No change.

I tried to push the float down slowly meanwhile checking the Ohms to check the points. Starting on 199.3, 151.9, 125.9, 102.0, 78.1, 55.2, 32.6. Something is missing!
One of the reed switches most be stuck closed and always "give" around 25 Ohms too much. If I take all mine readings and take 25 Ohms off = 174, (150), 126, 100, 77, 53, 30, 7. Remember my VDO gauge expect values between 3 and 180 Ohms.
After it was identified that probe is defective, it was time to try to get the probe out. No one had written back on how the probe is taken out. But the probe top had some cutouts on the sides what could look like some place for a spanner. After a light pull with the "Swedish key


Now is to find out about new WEMA fuel probe (1 ¼" BSP thread) has the same thread as the old probe.

Google says = "1-1/4 Inch BSP" = "41.91 mm / 1.650"

flyverjonas- Nombre de messages : 13
Localisation : Denmark
Constr./proprio. : MCR01 ULC sn:406
Date d'inscription : 27/12/2022
 Re: Fuel gauge
I took the choice and bought the probe from WEMA with thread "1 ¼ BSP thread", in 350mm length, since the old probe was 350mm.
It was difficult to get the probe threads to get into the tank thread, but in the end it worked. Remember to clean the tank thread with a pointed object to remove old sealant, as it is then much easier to screw the new probe down after cleaning. Also remember to clean the tank afterwards, as some of the old sealing compound falls down in the tank, when you clean and screw the new probe in.

WEMA model S3 included 2 rubber o-rings that seal the surface, I also chose to seal with some fluid gasket that can withstand fuel, around the edge.
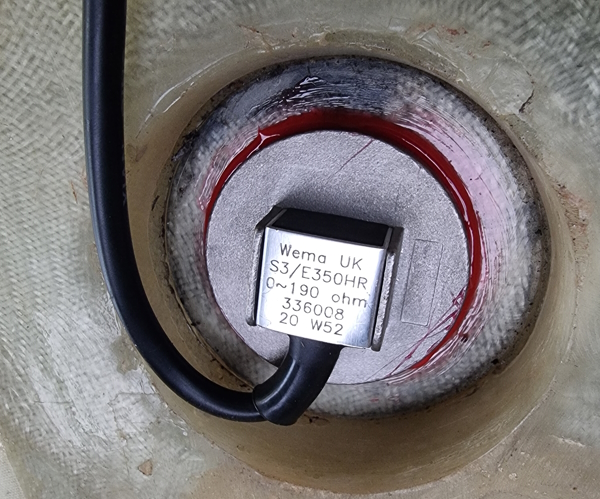
I measured the resistance in the new probe with great results 0.1 Ohm when empty and 189.7 Ohm when full.
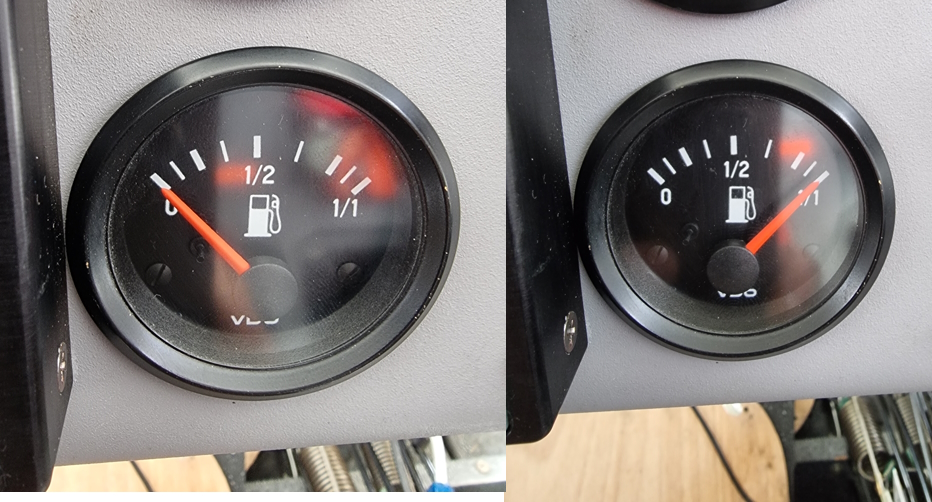
Both the gauge and I are happy with the new probe
Thanks to everyone who has replied!
It was difficult to get the probe threads to get into the tank thread, but in the end it worked. Remember to clean the tank thread with a pointed object to remove old sealant, as it is then much easier to screw the new probe down after cleaning. Also remember to clean the tank afterwards, as some of the old sealing compound falls down in the tank, when you clean and screw the new probe in.

WEMA model S3 included 2 rubber o-rings that seal the surface, I also chose to seal with some fluid gasket that can withstand fuel, around the edge.

I measured the resistance in the new probe with great results

Both the gauge and I are happy with the new probe
Thanks to everyone who has replied!

flyverjonas- Nombre de messages : 13
Localisation : Denmark
Constr./proprio. : MCR01 ULC sn:406
Date d'inscription : 27/12/2022
Cheeseman1112 aime ce message
 Re: Fuel gauge
Hello Flyverjonas,
It would be interesting to disassemble the old probe (if possible) and find where the problem was.
Mini
It would be interesting to disassemble the old probe (if possible) and find where the problem was.
Mini

Mini- Nombre de messages : 1114
Localisation : LFAI (Nangis) et LFKX (Méribel)
Constr./proprio. : Proprio. VLA n° 36 912S tripale PV électr.
Date d'inscription : 10/10/2008
 Re: Fuel gauge
Mini a écrit:Hello Flyverjonas,
It would be interesting to disassemble the old probe (if possible) and find where the problem was.
Mini
Hi Mini,
It was one of the reed switches there was failed and was stuck closed. There was also a fuel smell inside the probe.
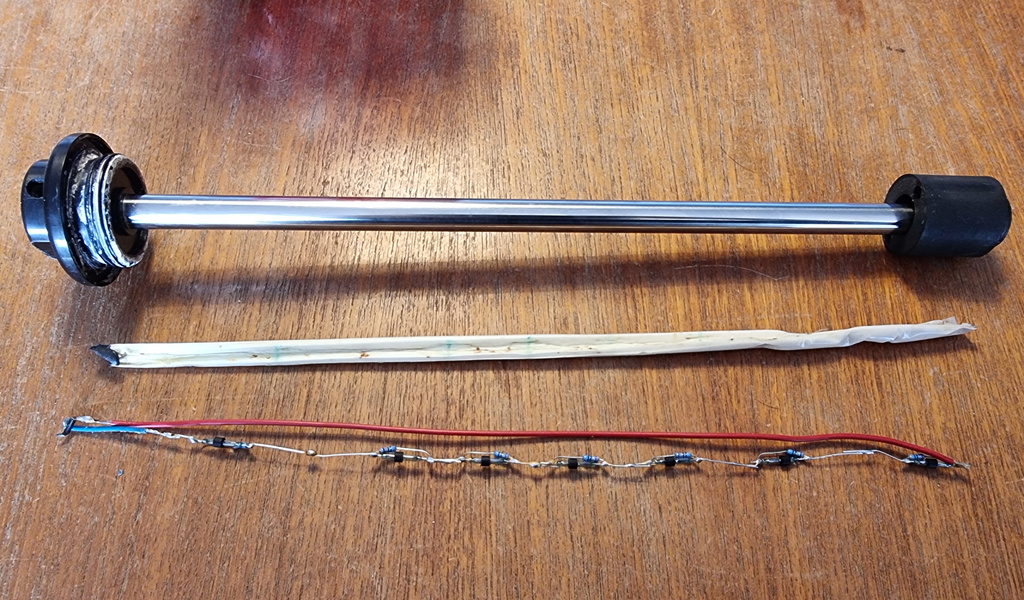

I have been airborn with the new probe two times now. It works perfect

flyverjonas- Nombre de messages : 13
Localisation : Denmark
Constr./proprio. : MCR01 ULC sn:406
Date d'inscription : 27/12/2022
Cheeseman1112 aime ce message
 Re: Fuel gauge
Hi,
Thanks flyverjonas for that interresting report.
Do you think the old probe would have been repairable ?
Mini
Thanks flyverjonas for that interresting report.
Do you think the old probe would have been repairable ?
Mini

Mini- Nombre de messages : 1114
Localisation : LFAI (Nangis) et LFKX (Méribel)
Constr./proprio. : Proprio. VLA n° 36 912S tripale PV électr.
Date d'inscription : 10/10/2008
 Sujets similaires
» Aluminium fuel tank
» Fuel flow FF1
» Glass fibre fuel tank
» fuel flow corrosion
» Réservoir supplémentaire
» Fuel flow FF1
» Glass fibre fuel tank
» fuel flow corrosion
» Réservoir supplémentaire
Page 1 sur 1
Permission de ce forum:
Vous ne pouvez pas répondre aux sujets dans ce forum