commande du trim d'aileron
5 participants
Le MCR 01: notre passion partagée :: Construction :: Pendant la construction et l'évolution de votre MCR :: Commandes de vol
Page 1 sur 1

commande du trim d'aileron
patrice hebert Lun 19 Mai 2014, 15:37
Quelqu'un pourrait il me dire quel circuit faut il entre le moteur du trim d'aileron (servo Hitec HS 475hb) et la commande par boutons poussoirs.
Merci pour vos réponses
PH
Merci pour vos réponses
PH
patrice hebert- Nombre de messages : 12
Localisation : LFNE
Constr./proprio. : proprio
Date d'inscription : 17/02/2013
Re: commande du trim d'aileron
Luciano Jannone Jeu 01 Oct 2015, 03:01
Toujours pas de réponses ?
Merci d'avance.
Bons vols
Luciano
Merci d'avance.
Bons vols
Luciano
Luciano Jannone- Nombre de messages : 643
Localisation : Bruxelles et Gap
Constr./proprio. : Propriétaire de Bohfino2, un superbe MCR01-UL 100cv (sn: 394) acheté neuf en juin 2009 et qui compte à ce jour plus de 1.100 heures de vol
Date d'inscription : 02/10/2008
Re: commande du trim d'aileron
Emmanuel76 Jeu 01 Oct 2015, 07:19
Bonjour Luciano,
C'est très simple, la réponse (y compris le code fourni par Michel) est dans le sujet https://mcr01passion.forumperso.com/t789-trim-d-aileron-gadget-ou-necessite?highlight=trim+aileron
Je me débrouille en électronique mais je n'avais jamais touché à un microcontrôleur : l'utilisation d'une carte Arduino (ou de son clone de chez Selectronic) est un jeu d'enfant et en 10 min c'st réglé !
Emmanuel76- Nombre de messages : 87
Age : 46
Localisation : Normandie
Constr./proprio. : Constructeur MCR01 ULC n°423
Date d'inscription : 23/05/2014
Re: commande du trim d'aileron
Luciano Jannone Jeu 01 Oct 2015, 07:23
Bonjour,
il me semblait bien avoir vu quelque chose à ce sujet.
Merci!
Bons vols,
Luciano
il me semblait bien avoir vu quelque chose à ce sujet.
Merci!
Bons vols,
Luciano
Luciano Jannone- Nombre de messages : 643
Localisation : Bruxelles et Gap
Constr./proprio. : Propriétaire de Bohfino2, un superbe MCR01-UL 100cv (sn: 394) acheté neuf en juin 2009 et qui compte à ce jour plus de 1.100 heures de vol
Date d'inscription : 02/10/2008
Re: commande du trim d'aileron
marc314 Ven 02 Oct 2015, 10:27
En juillet dernier, j'ai un peu adapté le code en ajoutant quelques fonctionnalités dont la possibilité de revenir directement au neutre. Je vous le transmets ci-dessous (en mode freeware pour utilisation et adaptation sans modération autre que le simple rappel des auteurs).
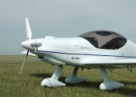
Et voici une photo du prototype (sans l'avion) :

Vous remarquerez bien sûr que le bouton droit est vert et que le gauche est rouge
MP
- Code:
//*******************************************************************************
// TITLE:    STEER A ROLL TRIM With an Arduino, two buttons and a servo-motor
//
// AUTHOR:   Michal RINOTT <https://www.arduino.cc/en/Tutorial/Knob>
//
// MOD.:     Michel RIAZUELO (March 2013)
//           -> include serial communication for debugging
//
//           Marc PERAY (July 2015)
//           -> comment, clear and harden the code
//           -> full wiring guide inside the source file
//           -> change the delay to make possible a simple increment/decrement with a clic
//           -> goto neutral position pressing the two buttons together
//           -> give more time for potentialy other activities
//           -> input of 1 to 3 digits for the monitoring
//           -> test of the buttons in monitoring mode
//           -> directives de compilation pour programme plus petit sans MONITORING
//
// WIRING:   Componants             to Arduino's DIGITAL pins
#define     LEFT_BUTTON            10
//           LEFT_BUTTON_bis        Ground        // ;-)
#define     RIGHT_BUTTON           8
//           RIGHT_BUTTON_bis       Ground
#define     SERVO_MOTOR            9             // yellow
//           SERVO_MOTOR_plus       5V            // red
//           SERVO_MOTOR_minus      Ground        // black
//
// PARAMETERS:                        // that can be changed
#define      MONITORING    true      // 'true' or 'false' if you want or don't the MONITORING
#define      MAX_DEGREES    175      // maximum position in degrees of the servo-motor (maximum 180)
#define      MIN_DEGREES      5      // minimum position in degrees of the servo-motor (minimum 0)
#define      INIT_DEGREES    90      // initial position in degrees of the servo-motor (between MIN and MAX)
#define      STEP_DEGREES     5      // value of one increase or decrease in degrees (more than zero)
#define      TIME_TO_WAIT   200      // minimum time between two modifications (milli-secondes)
//
//******************************************************************************

#include <Servo.h>            // standard library for servo-motor
Servo rollTrimServo;          // defines rollTrimServo as a servo-motor

long   milliSForNextInput = 0;  // replaces the instructions 'delay(...)'

void setup()
{
#if MONITORING
  Serial.begin  ( 115200 );
  Serial.println( "START MONITORING" );
  Serial.print  ( "Defining the pin numbers ... " );
#endif

  pinMode( RIGHT_BUTTON, INPUT );
  pinMode( LEFT_BUTTON,  INPUT );

  digitalWrite ( RIGHT_BUTTON, HIGH );    // Activation of the 'PULL UP' resistances
  digitalWrite ( LEFT_BUTTON,  HIGH );    // idem

  rollTrimServo.attach( SERVO_MOTOR, MIN_DEGREES,  MAX_DEGREES );
  rollTrimServo.write( INIT_DEGREES );

#if MONITORING
  Serial.println( "done" );
  Serial.print  ( "Initial position of the servo is " );
  Serial.print  ( rollTrimServo.read() );
  Serial.println( " degrees." );
  Serial.println( "Choose a new position typing a number between 0 and 180 degrees." );
#endif
}

void loop()
{
  long  requiredPosition  = rollTrimServo.read();

  if ( digitalRead( RIGHT_BUTTON ) == LOW and (millis() > milliSForNextInput) )
  {
#if MONITORING
    Serial.println( "Right button is pressed.");
#endif
    requiredPosition += STEP_DEGREES;
  }

  if ( digitalRead( LEFT_BUTTON ) == LOW and (millis() > milliSForNextInput) )
  {
#if MONITORING
    Serial.println( "Left  button is pressed." );
#endif
    requiredPosition -= STEP_DEGREES;

    // Protection if a connection from a button is accidently linked to the ground
    // you can choose the opposit BUTTON to neutralize the trim
    // this may be used also to go directly to the neutral position pressing the two buttons together
    if ( digitalRead( RIGHT_BUTTON ) == LOW )
    {
      requiredPosition = INIT_DEGREES;
      milliSForNextInput = millis() + 2 * TIME_TO_WAIT;   // twice the time to avoid bounce at the end
    }
  }

#if MONITORING
  if ( Serial.available() )
  {
    requiredPosition = Serial.parseInt();
    while ( Serial.available() ) Serial.read();   // Sends the end of the message to the garbage can!
    Serial.print  ( "You typed " );
    Serial.print  ( requiredPosition );
    Serial.println( " degrees." );
  }
#endif

  if ( requiredPosition != rollTrimServo.read() )
  {
    requiredPosition = max( MIN_DEGREES, min(requiredPosition, MAX_DEGREES) );
    rollTrimServo.write( requiredPosition );
    milliSForNextInput = millis() + TIME_TO_WAIT;

#if MONITORING
    Serial.print  ( "The new position of the servo-motor is " );
    Serial.print  ( rollTrimServo.read() );
    Serial.println( " degrees." );
#endif
  }

  // Here is a lot of place and power available to do a lot of other interesting actions ;-)
  // Feel free to mail me your wish list ( peray at free dot fr ) ... and, better, send your programs :-)
}
Et voici une photo du prototype (sans l'avion) :
Vous remarquerez bien sûr que le bouton droit est vert et que le gauche est rouge
MP

marc314- Nombre de messages : 181
Localisation : LFXU
Constr./proprio. : ULC 80CV Blue Line n°407
Date d'inscription : 19/04/2009
Re: commande du trim d'aileron
RIAZUELO Mar 06 Oct 2015, 08:02
Bonjour Marc et à tous,
Je ne redirai pas ici ce que je disais sur le sujet parallèle à celui-ci, voir ICI.
Je ne suis pas sûr que le gain de place en mémoire, et les sophistications qui vont avec pour l'obtenir, soit un bon objectif. Vu le coût que l'on peut qualifier de dérisoire des modules ARDUINO, on peut s'en offrir un par fonction à traiter avec un code léger et simple, garant de la fiabilité si rassurante dans nos engins volants.
La commande de trim d'aileron qui ne nécessite pas d'affichage a vocation à être traité avec l'ARDUINO le plus petit et le moins cher qu'on va oublier très vite.
La pression simultanée sur les deux boutons pourrait être exploitée avec la détection d'une manœuvre prolongée (2 ou 3 s par ex) permettant de désactiver le trim en le mettant au neutre à la suite d'un problème. Les micros contacts des manches à la TOP GUN sont fragiles, cela peut arriver ...
Et je suis toujours émerveillé par les possibilité de l'addition des contributions. La collaboration battra la concurrence à plate couture, c'est hautement probable
Bons vols à tous,
Michel

RIAZUELO- Nombre de messages : 1308
Localisation : CHOLET LFOU
Constr./proprio. : Constructeur VLA F-PMTR
Date d'inscription : 23/07/2009
» Butée commande de vol / élastiques/trim ray allen
» Trim d'aileron
» Remplacement de l'API d'iAero par un module plus simple : c'est possible ?
» Remplacement du système de trim profondeur en vue de l'installation de la commande par verin des volets sur ULC
» 4S: remplacement du trim version initiale par le servo trim
» Trim d'aileron
» Remplacement de l'API d'iAero par un module plus simple : c'est possible ?
» Remplacement du système de trim profondeur en vue de l'installation de la commande par verin des volets sur ULC
» 4S: remplacement du trim version initiale par le servo trim
Le MCR 01: notre passion partagée :: Construction :: Pendant la construction et l'évolution de votre MCR :: Commandes de vol
Page 1 sur 1
Permission de ce forum:
Vous ne pouvez pas répondre aux sujets dans ce forum|
|
|